


Wondershare
Data Recovery provides you with a totally amazing using experience. If you are
a novice, you can try it in the Wizard Mode first, which allows you to recover
what you need easily by doing several clicks. If you are an experienced one,
you can use the Standard Mode to get more advanced experience.
Recover Data in Wizard Mode
Step1.
Choose the Wizard Mode recovery
After
launching the program, you are guided to the Wizard Mode automatically. Here
you only need to click on "Next" to answer two simple questions and
the program will do the rest for you.
Step2. Select the file type
you want to recover
You
are here in front of the first question. View file types and check the one that
you are going to recover, or check "All files" if you want to recover
various data in different file types. There are graphic, audio, video, document
and email file types.
Step3. Tell where you lost
your files
The
second question is where you lost your files, such as from the Recycle Bin,
Desktop and My Documents, partitions, or the external removable devices. You
can also give an order to search your whole computer if you don’t remember the
place, or to search the folder if you know exactly the place.
Step4. Begin to search your
lost files
Now
you can click on "Start" to find your lost data. BTW, you must have
noticed that there is "Deep Scan" or "Raw File Recovery"
option displayed. Generally, "Deep Scan" enables you to recover files
lost due to formatting, while "Raw File Recovery" can help to
retrieve all files that you lost long time ago for various reasons. Therefore,
you can ignore them if you only want to recover the files you deleted recently.
Step5. Preview and recover
your lost files
If
you chose "All files" in the previous step, the scanning result would
be displayed in file types, such as archive, audio, database, document, email,
graphic, video, etc. You can recover them selectively after previewing. PDF,
PPT, RAR, ZIP, Excel, and photos like PNG, JPG, JPEG, TIF, etc. can be previewed
before recovery.
Additionally,
you can check the previous path of those files by switching "File
type" to "Path".
Important: Do not save files to the location where
you lost your files. If you don't recover the files you are looking for, they
will be overwritten by your new file saving.
Tips:
Recover in advance: During the recovery process, you can
check files at the same time. If the files you want have been scanned out, you
can "Pause" to recover them first. Then "Continue" or
"Stop" your scan.
Filter: You can filter your lost files in the
scanning result by search the filename or path.
Save the scanning result: When stopping the scanning, you can save
the current scanning results for recovery at a later time.
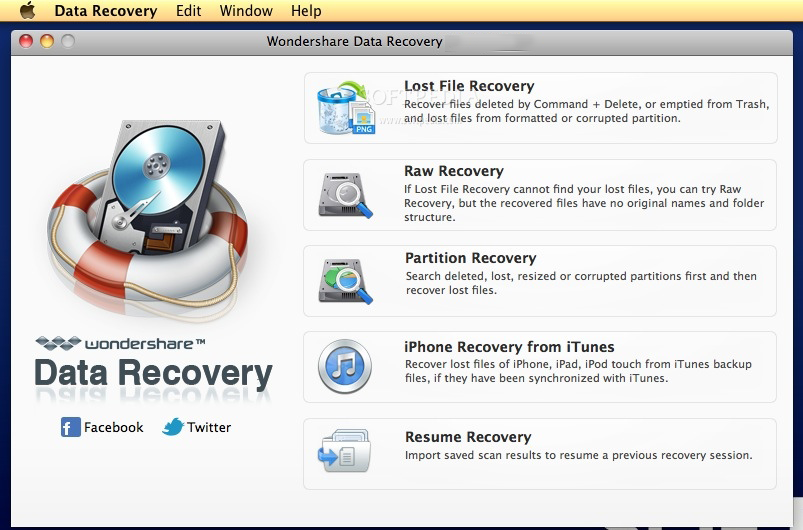
Recover Data in Standard Mode
Step1. Choose the Standard Mode recovery
When
running the program, choose to go to "Standard Mode". Here you can
choose Lost File Recovery, Partition Recovery, Raw File Recovery and Resume
Recovery.
Step2. Select the recovery way
#1. Lost File Recovery
Lost
File Recovery can recover deleted files such as deleted by Shift + Delete or
emptied from the Recycle Bin, no matter from your computer or other removable
media.
Select
the disk or a specific folder where you lost your files, and click on “Start”
to scan and recover them. Go to step5 above.
#2. Partition Recovery
Partition
Recovery supports the recovery of lost, deleted, resized or damaged partition.
Select
the disk where you lost your partition, and click on "Next".
After
scanning the lost partitions, choose the one you want to recover files from,
and hit on "Start". Go to step5 above.
#3. Raw File Recovery
You
are suggested to use Raw File Recovery only when previous scans cannot find
your lost files. This recovery process will take you lots of time and doesn't
show you the file names and paths.
Select
a partition to recover files from, and click on "Start". Go to step5
above.
There
are scan options, quick scan for deleted files or long-time scan for all file.
You can check one of them before performing the scan.
#4. Resume Recovery
Resume
Recovery is only used for saved scan results. If you have a scan result, import
the saved scan result to resume a previous recovery session for time saving.
Then
it begins to continue scanning your lost files. When the scanning completes,
switch to step5 above.


1) Download & Exract With WinRAR
2) Copy Crack File & Past in C Drive
Program File Wondershare Data Recovery Folder
How To Download


0 comments:
Post a Comment